 Business Management
 IT Services
 Business Management
 Business Analytics
 Business Analytics
 Business Analytics
 Best Credit Cards
 Best Credit Cards
 Best Credit Cards
Como enviar e-mail de teste no Mailchimp? To send a test email in Mailchimp, follow these steps: 1. Log in to your Mailchimp account. 2. Go to the Campaigns page. 3. Choose the campaign you would like to test. 4. Click on the arrow next to the "Preview and Test" button. 5. Select "Send a test email" from the dropdown menu. 6. Enter the email addresses of the recipients you want to send the test email to. 7. Customize the subject line and other settings if needed. 8. Click "Send Test" to send the email. Note: Remember to use a valid email address to receive the test email.
Mailchimp is an excellent platform for creating and managing email marketing campaigns. Before sending your email campaign to your entire subscriber list, it's crucial to test it to ensure it looks perfect and functions correctly. In this article, we will guide you through the process of sending a test email in Mailchimp.
Step 1: Log in to your Mailchimp account
Access your Mailchimp account by entering your username and password on the Mailchimp login page. Once logged in, you will be directed to your Mailchimp dashboard.
Step 2: Create a campaign
To send a test email, you need to have an email campaign ready. If you don't have an existing campaign, you can create a new one by clicking on the "Create Campaign" button on your dashboard.
Step 3: Customize your email
Once you've created a campaign, you will be prompted to customize your email content. Use the drag-and-drop editor to add and arrange elements such as text, images, buttons, and social media icons. Make sure your email content reflects your brand and resonates with your target audience.
Step 4: Preview your email
Before sending a test email, it's essential to preview your email to ensure everything appears as intended. In the campaign editor, click the "Preview and Test" button, which is located at the top right corner of your screen. The preview feature allows you to see how your email will look on different devices.
Step 5: Send a test email
After previewing your email, it's time to send a test email. In the "Preview and Test" drop-down menu, select "Send a Test Email." A pop-up will appear, requesting you to enter the email addresses where you want to send the test email. You can enter one or multiple email addresses, separated by commas or semicolons.
Step 6: Review the test email
Once the test emails are sent, go to your inbox and check how the email appears. Pay attention to the formatting, images, links, and the overall message delivery. Make sure there are no typos, broken links, or any issues that might hinder the effectiveness of your email campaign.
Step 7: Make necessary adjustments
If you notice any problems or areas for improvement in your test email, go back to the Mailchimp campaign editor, make the necessary adjustments, and repeat steps 4 to 6 until you are satisfied with the result.
Step 8: Schedule or send your campaign
Once you have thoroughly tested your email campaign using the test email functionality in Mailchimp, you can now confidently schedule or send your campaign to your subscriber list. Mailchimp provides options for sending immediately, scheduling for a specific date and time, or setting up an automated campaign.
In conclusion, sending a test email in Mailchimp is a crucial step in ensuring the success of your email marketing campaigns. By thoroughly reviewing and adjusting your email content, you can deliver a seamless experience to your subscribers and maximize engagement and conversions. Follow the steps outlined above to send a test email and optimize your email campaigns for success.
To send a test email in Mailchimp, follow these steps: 1. Log in to your Mailchimp account. 2. Navigate to the Campaigns tab and select the campaign you want to test. 3. Once you are in the campaign builder, click on the "Preview and Test" dropdown menu. 4. Select "Enter preview mode" to see how your email will look to your recipients. 5. To send a test email, click on the "Send a test email" option and enter the desired email address. 6. Click "Send Test" to send the email to the specified address. Can I send a test email to multiple recipients?
No, you can only send a test email to a single recipient at a time in Mailchimp. However, you can send the test email to different recipients one by one if needed. Why should I send a test email before sending the campaign to my subscribers?
Sending a test email allows you to review and preview your email campaign before sending it to your subscribers. It helps you ensure that the email content, layout, links, and other elements are properly formatted and displayed correctly in different email clients and devices. By sending a test email, you can identify any issues or mistakes and make necessary adjustments before reaching your audience. Can I make changes to my campaign after sending a test email?
Yes, you can make changes to your campaign even after sending a test email. The test email is sent as a separate entity and does not affect the campaign itself. So, if you need to make changes based on the test email results, you can go back to the campaign builder, apply the necessary modifications, and send another test email. Can I send a test email to subscribers who are already in my mailing list?
Yes, you can send a test email to your existing subscribers, but you need to make sure that you select their email address as the test recipient. Remember to remove any test emails from your main mailing list to avoid sending duplicate emails to your subscribers.
 LATEST ARTICLES
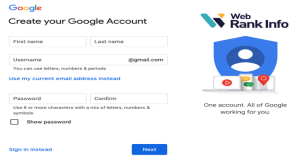
Are Google accounts free to make?
Are three types of strategies that organizations can use to adapt to enviro..
Can a single-member LLC add a second member later in Texas?
Can I do my masters in USA without GRE?
Can I be a data analyst if I'm bad at math?
Are two techniques used in descriptive analytics?
Are closed accounts good on your credit report?
Can a Visa card be used for gas?
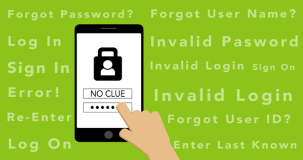
Are user name and user ID the same?
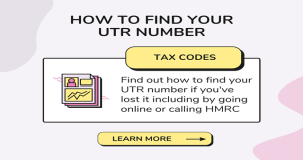
Can I find my UTR number online?

Do I need to get my car inspected before registration in SC?

Am I at risk if someone has my bank statement?
 POPULAR ARTICLES
Are Google accounts free to make?
Are three types of strategies that organizations can use to adapt to enviro..
Can a single-member LLC add a second member later in Texas?
Can I do my masters in USA without GRE?
Can I be a data analyst if I'm bad at math?
Are two techniques used in descriptive analytics?
Are closed accounts good on your credit report?
Can a Visa card be used for gas?
Are user name and user ID the same?
Can I find my UTR number online?
 Facebook
  Twitter
  Whatsapp
  Tumbler
  Pinterest